In this lesson, you will learn:
- How to use D3Lab x64 to convert all types of digital IO scans to 3D printable physical models
- How to approach difficult scans or scans with poor data if you are getting failed results
- How to take advantage of the “Model Already Oriented” and “Feeling Lucky” features to increase efficiency
Preface
Sections
- Starting the Model Builder Tool
- Orienting the Model
- Cleaning Up Scan Data
- Setting Parameters for Model Basing
- Options After Model is Based
- Advanced Features
Demonstration Videos
- How to quickly convert digital intraoral scans to 3D printable physical models
- Tips for dealing with poor scan data or difficult scans
- Advanced automation features that help to save more time
General CAD Definitions:
- Manifold or “Closed” Mesh – A 3D object that is solid or “watertight”. This applies to any 3D object, including IO and model/impression scans. Most things are not 3D printable unless they are manifold. Generally, IO scans will be non-manifold, while models/impressions scanned with a desktop 3D scanner will be manifold.
- Non-Manifold or “Open” Mesh – A 3D object that is not manifold. Model building converts a non-manifold IO scan to a 3D printable manifold object.
- “Basing” or “Building” Models – Removing extraneous scan data from the initial IO or desktop scans, repairing any remaining holes/defects and adding a vertical base under the refined scan data. The result mimics the traditional based plaster dental model in appearance, and is easily 3D printable.
Tool Parameters:
- Hollow Thickness – The width (in mm) that you want the thickness of the based model to have.
- Base Height – The height (in mm) that you want the base of your model to have, measured from the bottom most part of the scan.
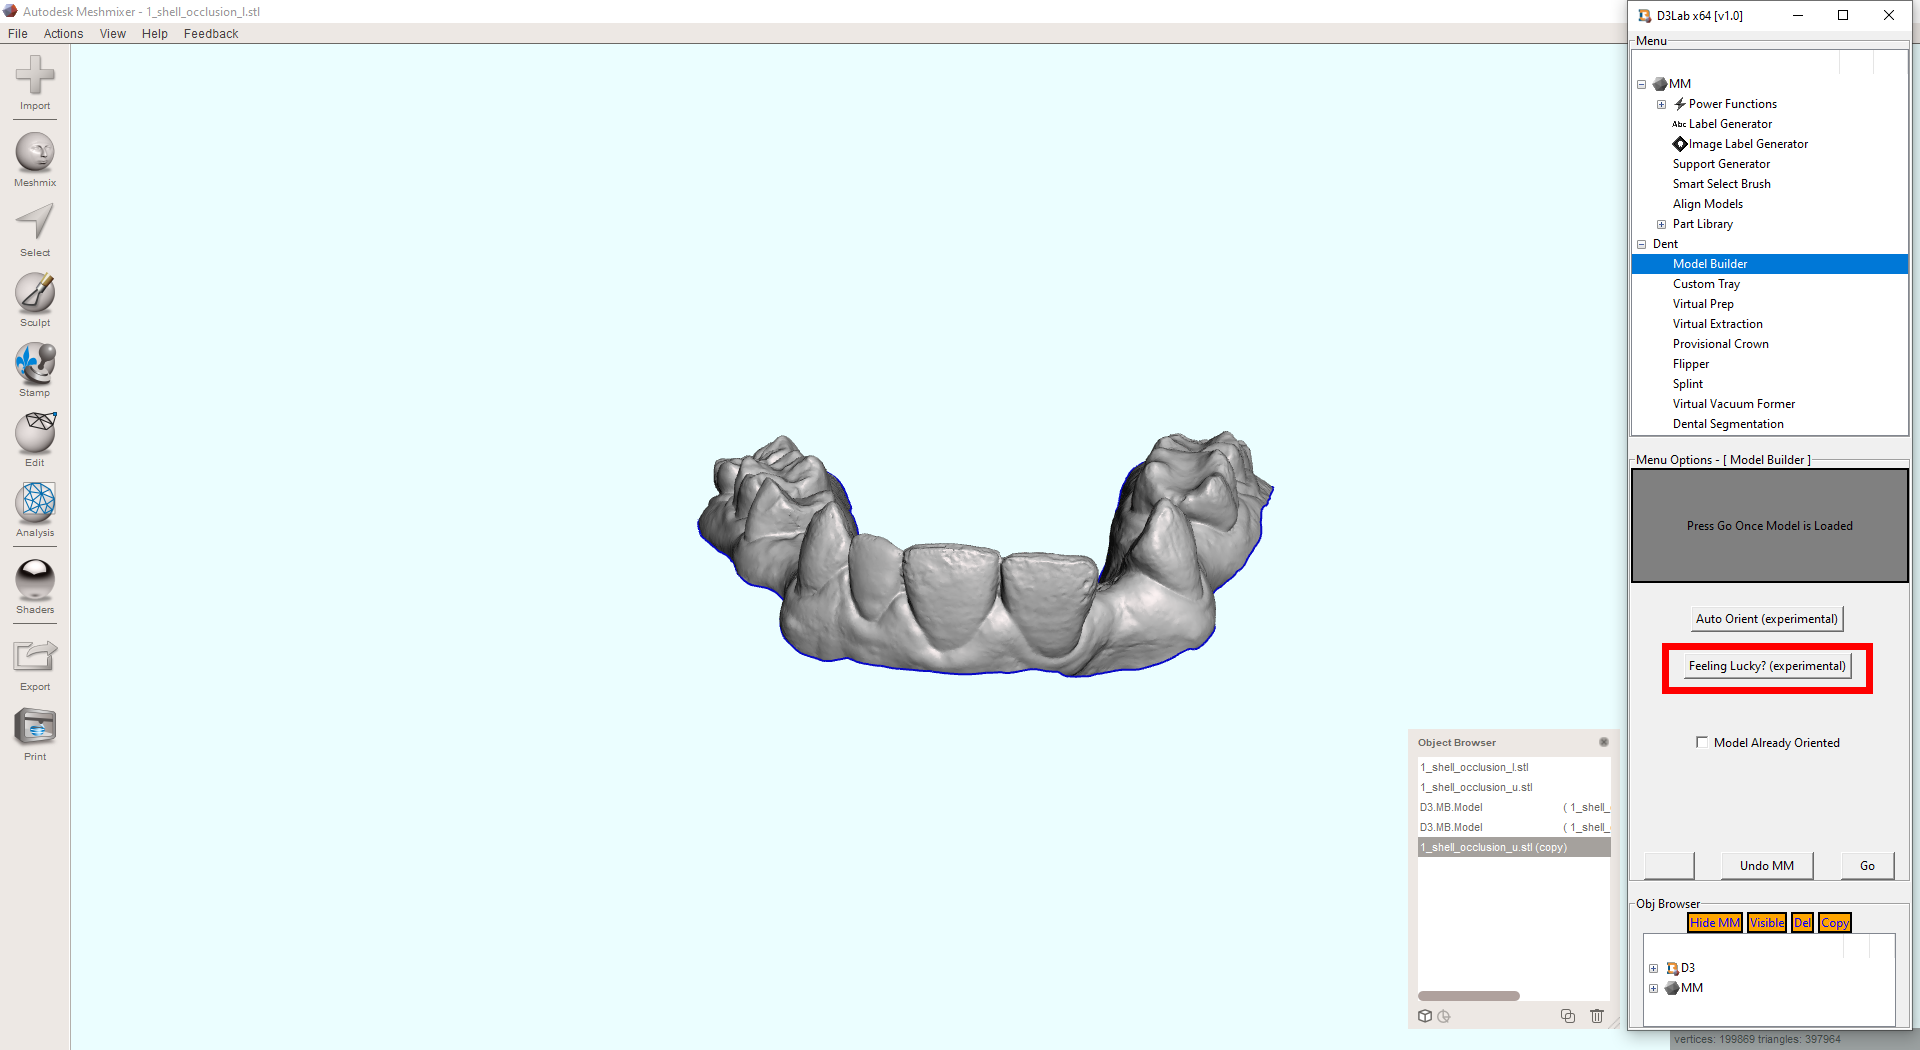
- Auto Orient – A button that automatically brings an object to the center of Meshmixer, and attempts to point it in the correct direction to assist in the following manual alignment steps.
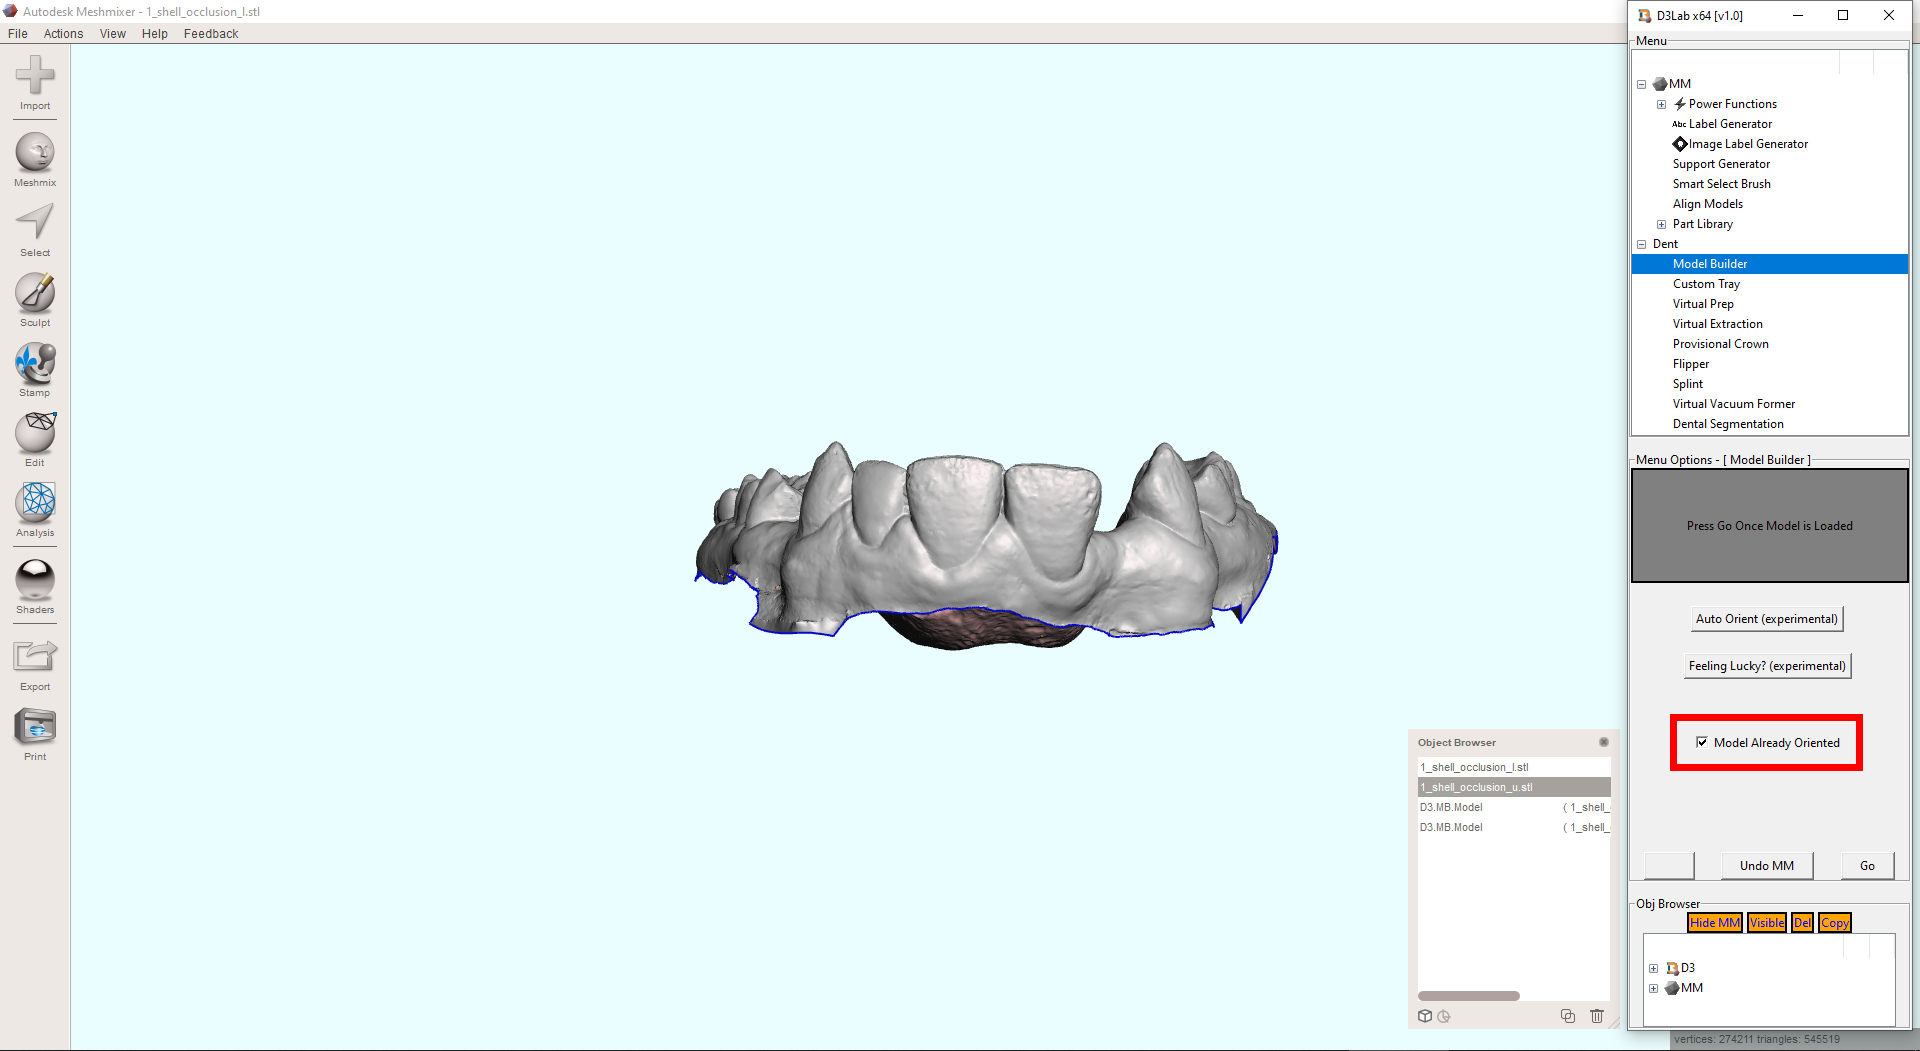
- Model Already Oriented – An option that when enabled, forces the Model Builder tool to skip the first three manual alignment steps. This is a helpful time-saver if you are certain your scan is already oriented correctly before running the tool.
- “Feeling Lucky” – A button that runs the entire Model Builder tool to completion without any steps or user input. Success of this feature is dependent not only on the scan being in proper alignment already (as with the “Model Already Oriented” option), but also that there is minimal extraneous data that needs to be removed (or it has been done already).
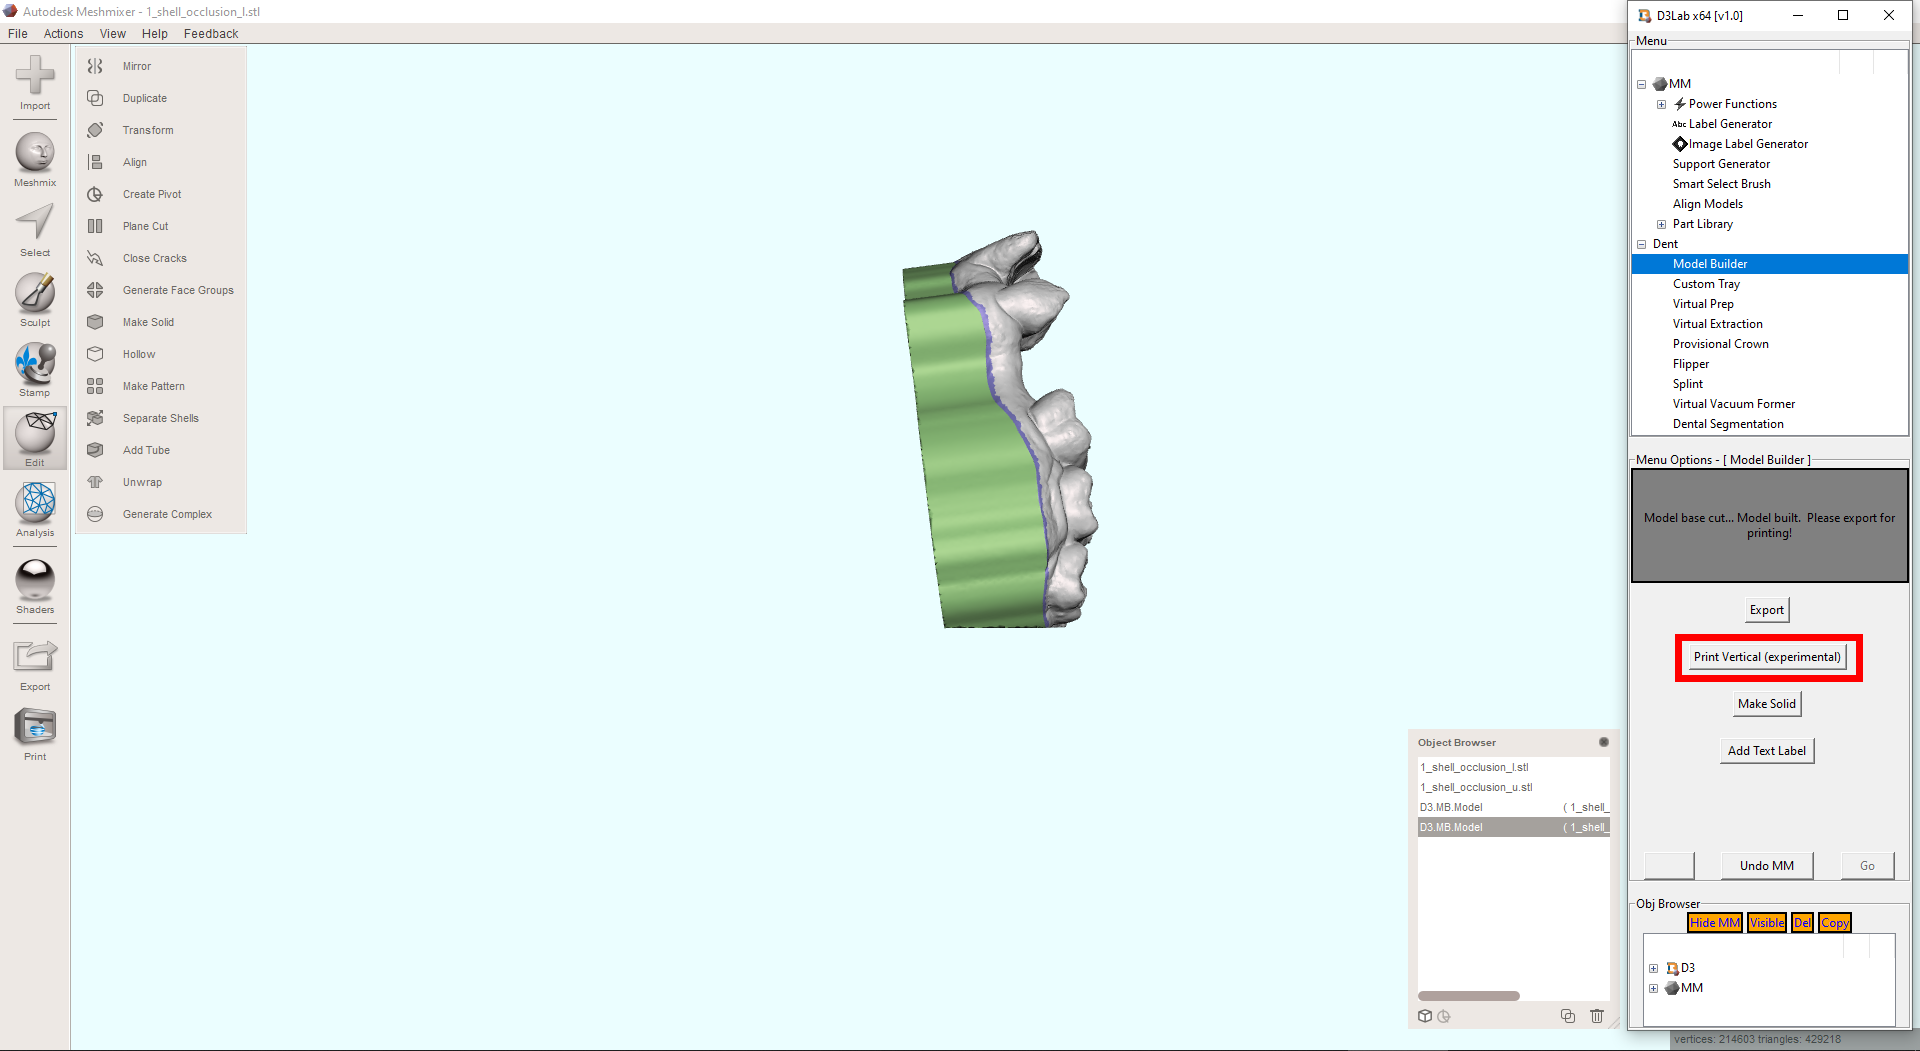
- Print Vertical – A button that is presented at the end of the Model Builder tool, that rotates the based model into a vertical orientation and makes a flat cut on the heel portion of the model. This is a quick attempt at making a based model 3D printable in the vertical orientation, to save space on the 3D printer’s build plate. It is considered experimental because it does not take overhangs into consideration, and it can only apply a single hard-coded rotation that may not be suitable for some models.
Model Builder – Start Tool – [Step 1]
Starting any of the tools in D3Lab x64 begins with clicking on the tool name in the top “Menu” panel:
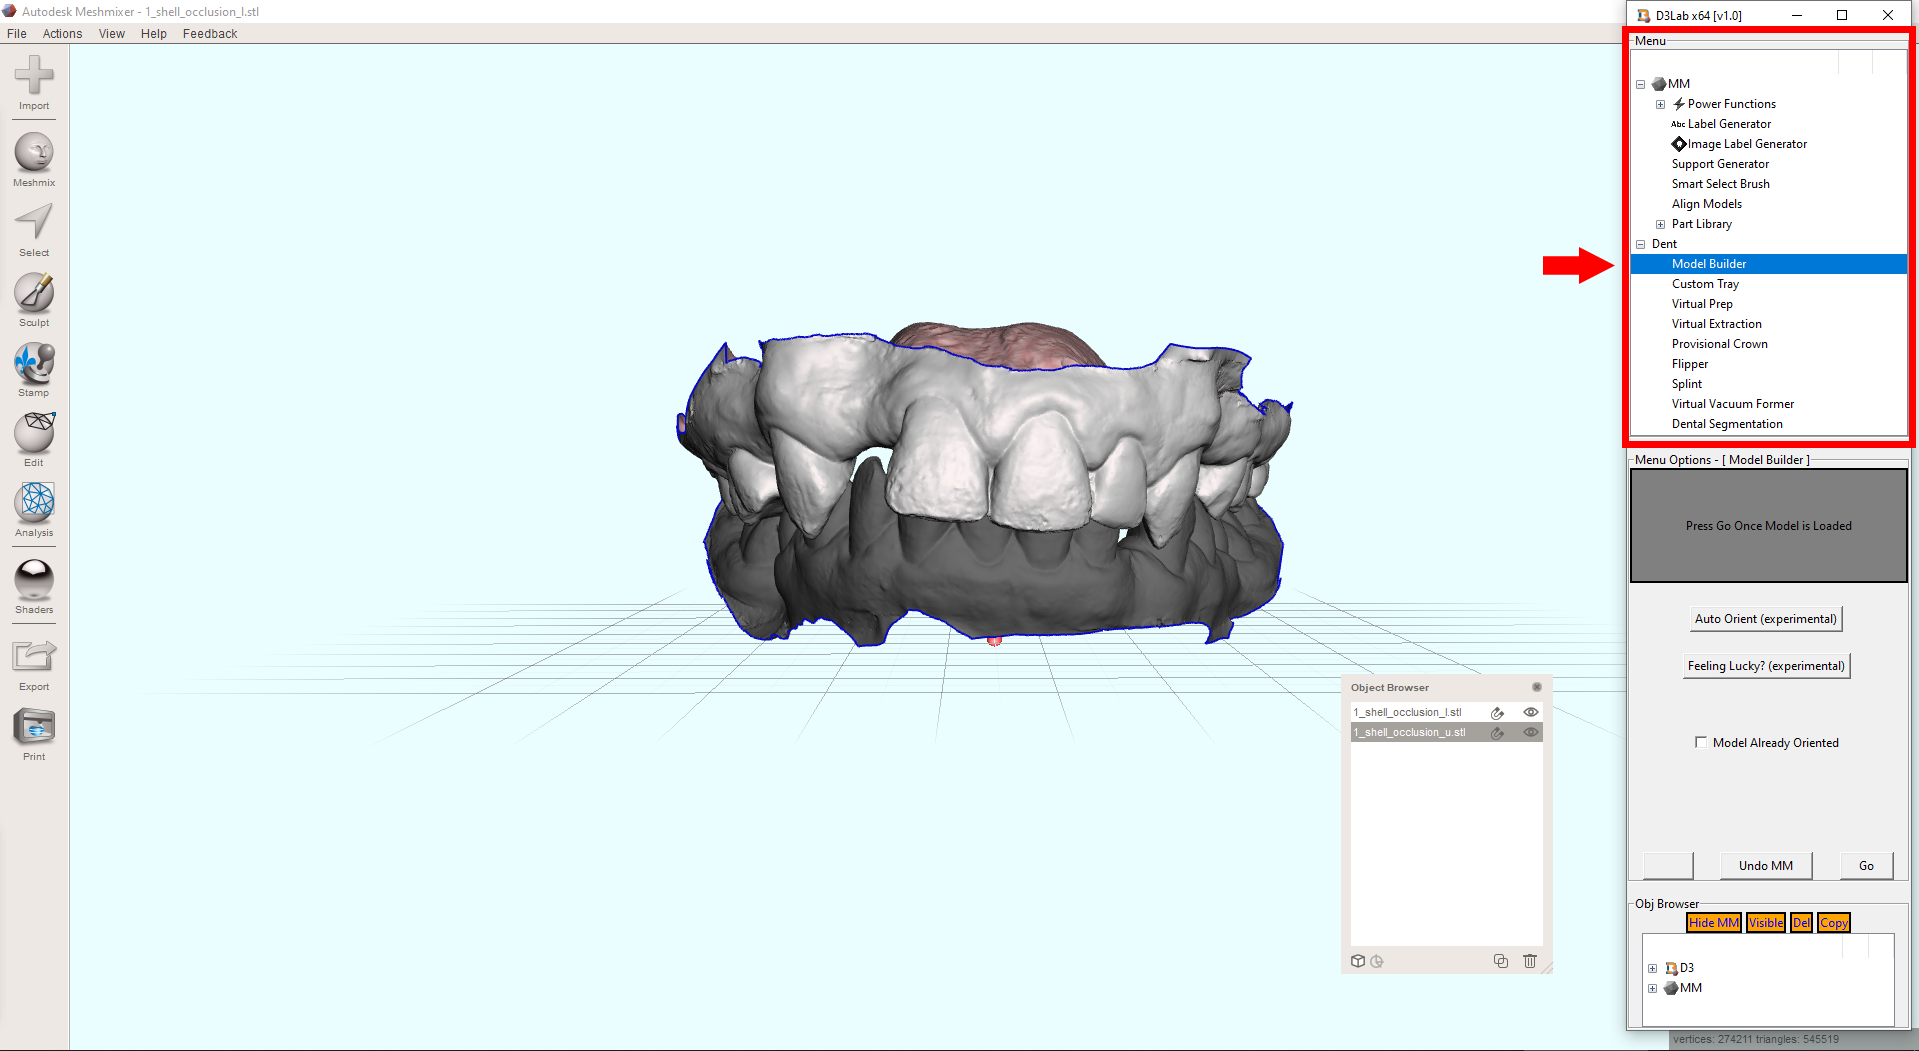
The tool tells you to start only once your scan is loaded into Meshmixer. It is common to have an upper and lower model imported at the same time, however, so it is a good idea to hide the opposing arch while we work. To do that, you first left click on the opposing model (darker grey / non-active) to select it. To toggle visibilit of an object, click on the button that says “Visible” down on the lower “Obj Browser” portion of D3Lab x64. That will hide the currently selected model, or make it visible if it was previously hidden. Make sure to left click on the working model in Meshmixer to make it actively selected before actually starting the tool.
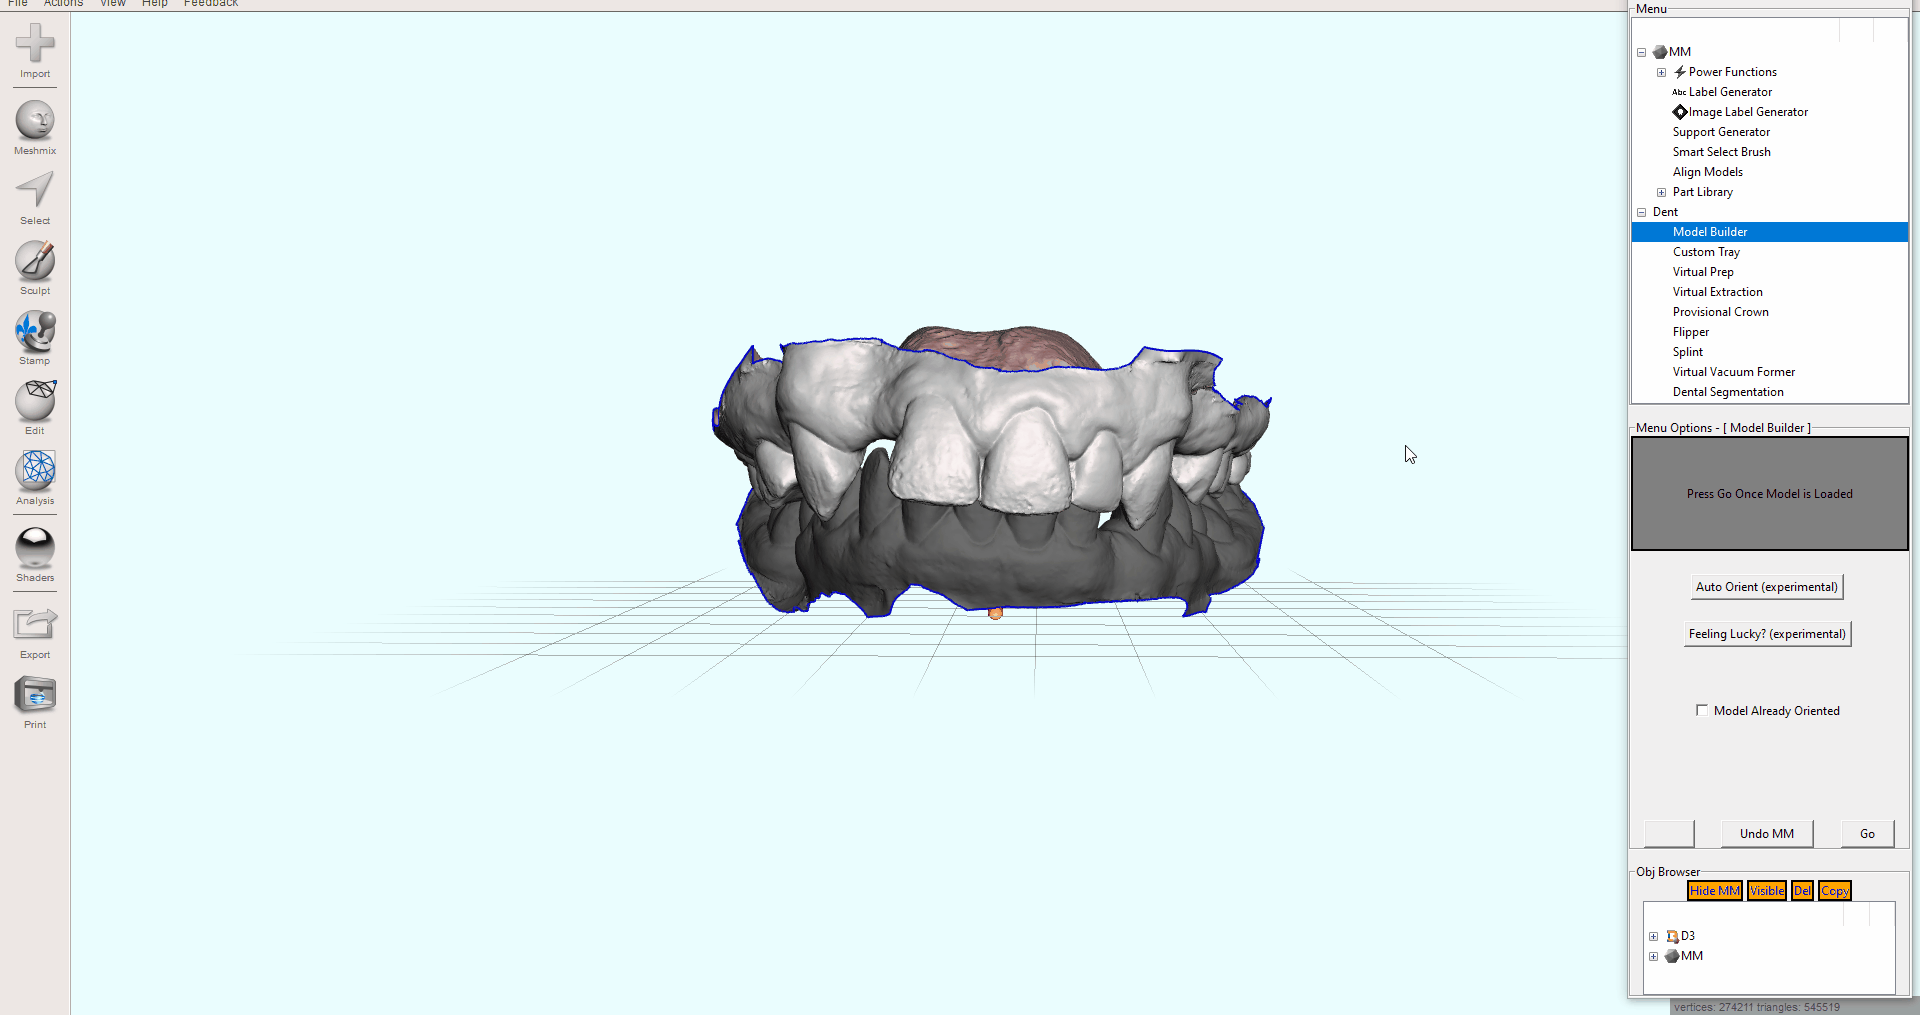
Once your working model is selected and the opposing is hidden, start the tool by pressing “Go”. At the end of this lesson we will circle back to the options presented to us at this time (Auto Orient, Feeling Lucky and Model Already Oriented).
Model Builder – Orient Model – [Step 2]
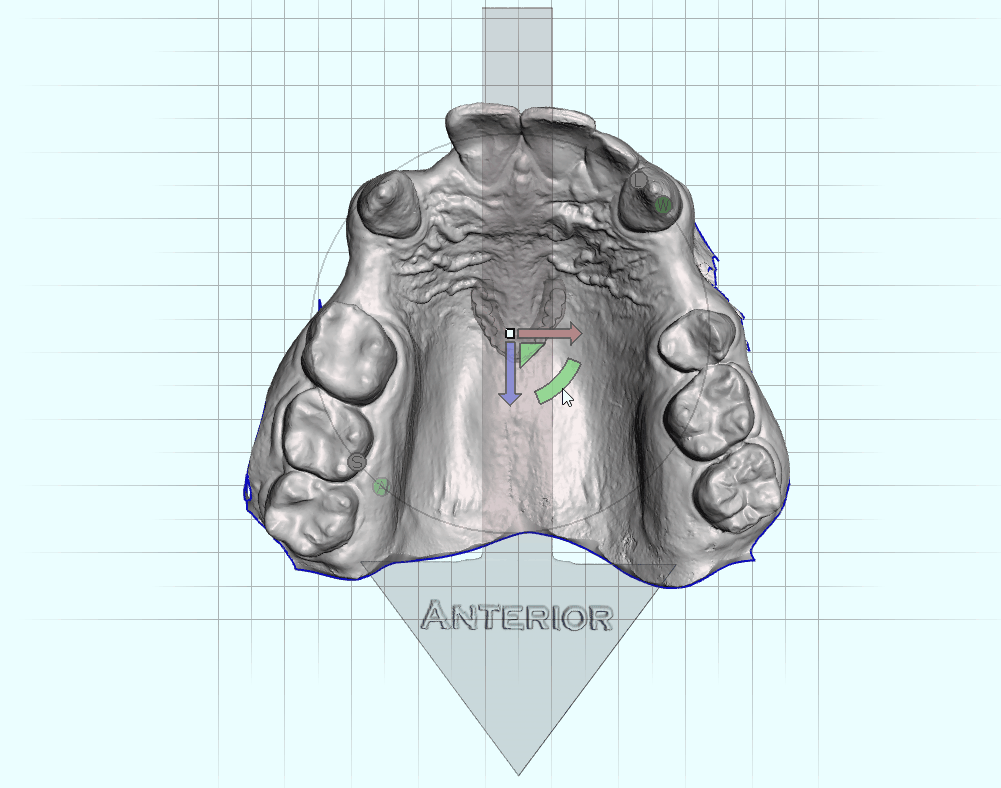
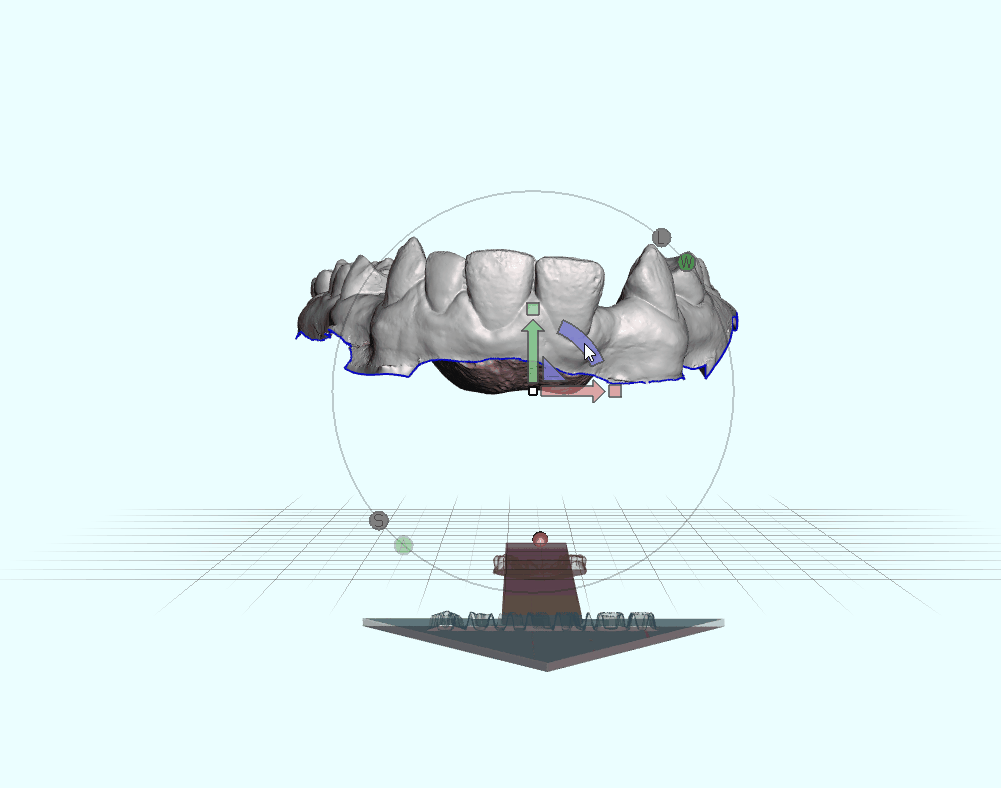
After pressing “Go” and starting the Model Builder tool, you will be asked to orient your model in all three dimensions one at a time, starting with the occlusal direction. Single left click and drag the colored curves that are now on top of your model to rotate it into the proper orientation.
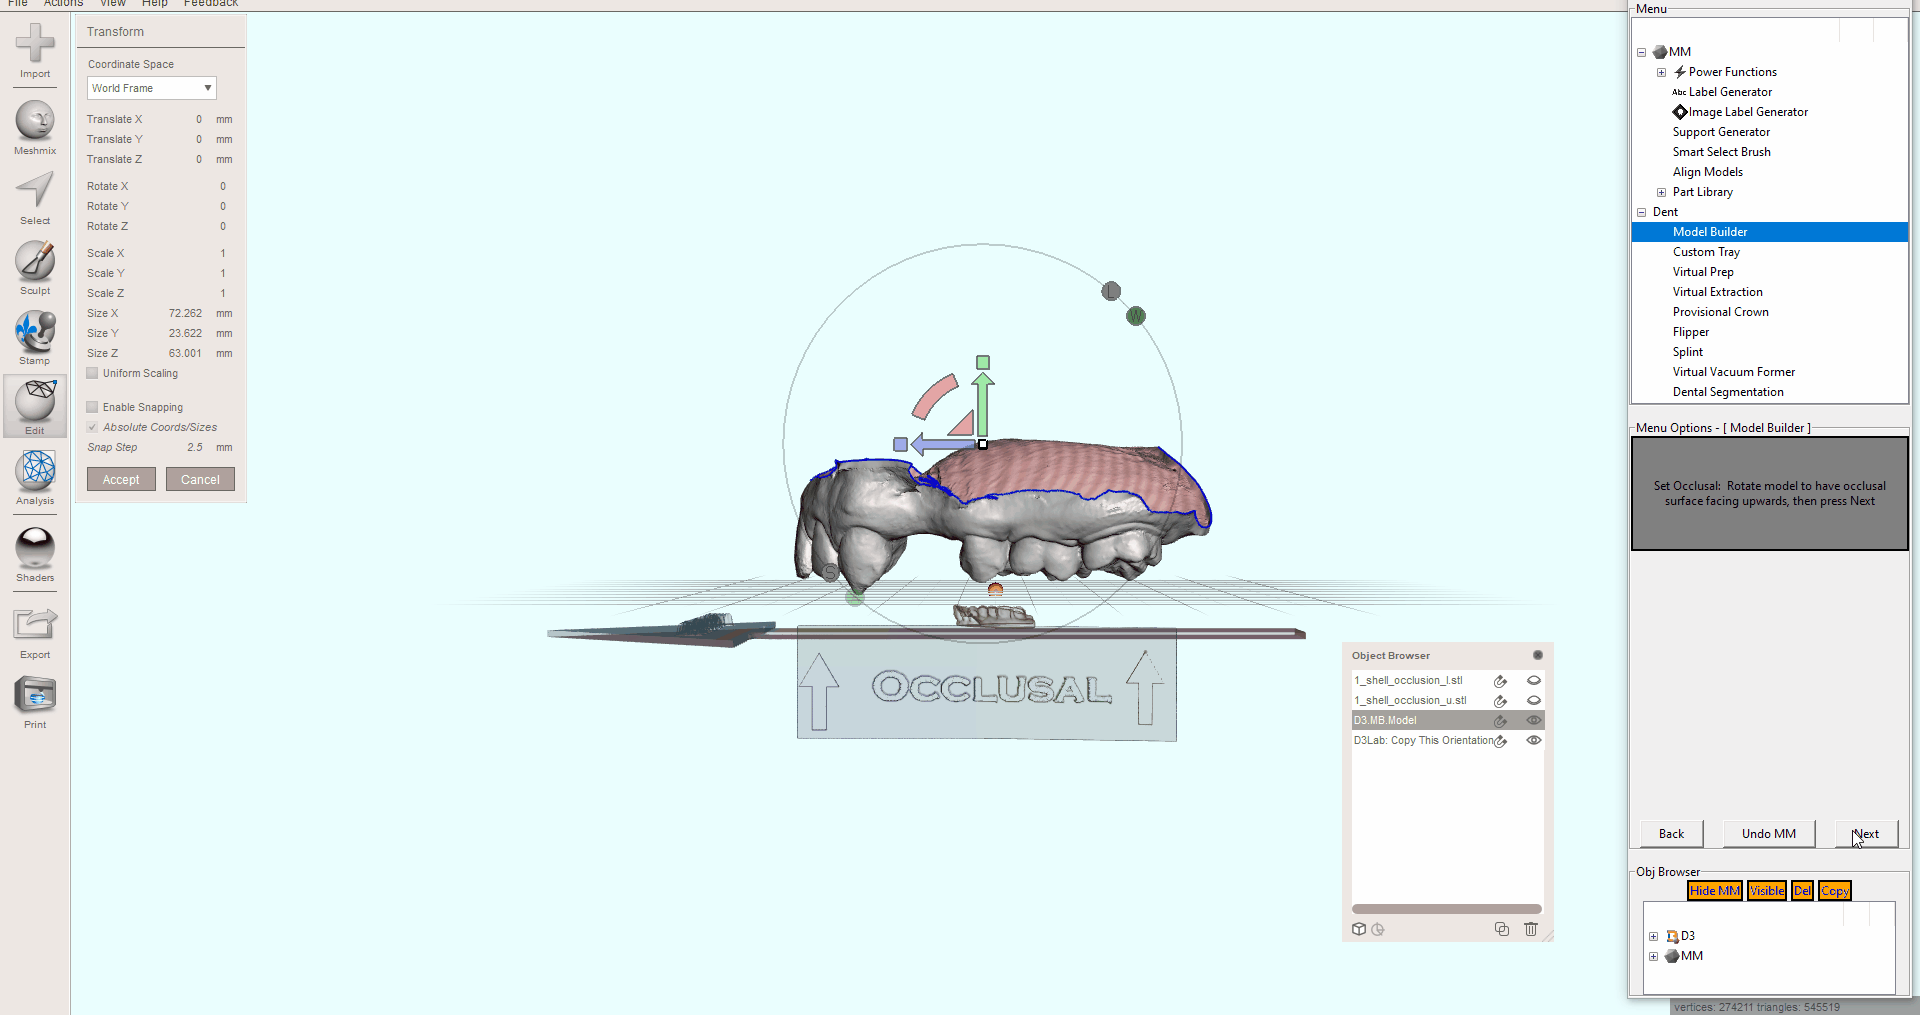
And then again for the anterior direction. And once more for the horizontal plane, pressing “Next” each time after setting the requested orientation.
Model Builder – Cleanup Scan Data – [Step 3]
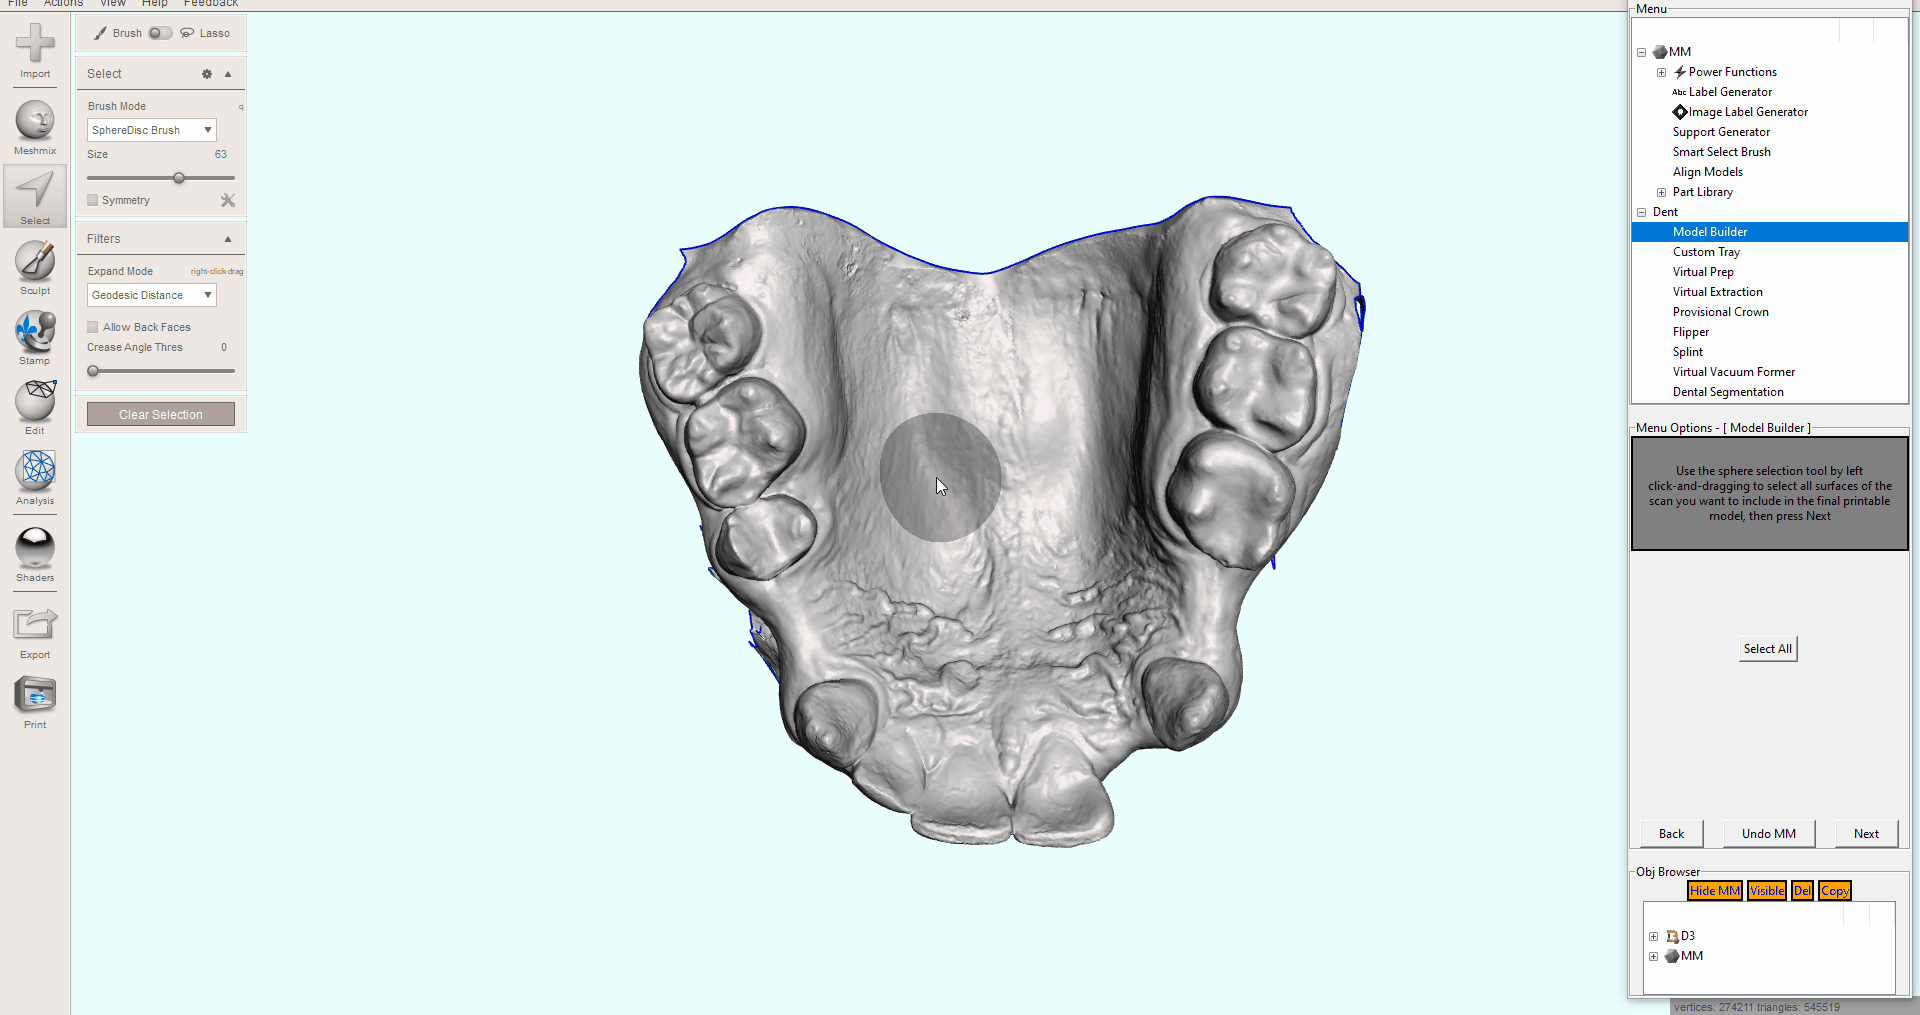
Most 3D scans, regardless of the source (IO scanner versus a desktop model scanner), have extra unwanted data or “noise” that was accidentally captured in the scanning processing. The next two steps allow you to efficiently select the areas of the scan that you want included in the based model, and then trim away any remaining unwanted portions. First, you must select the areas of the scan you want to include in the final 3D printable model by left click and dragging the grey circle over the surface of the scan. Selected regions will turn orange. If you select too much, or want to remove some of the selection, you can hold the CTRL key down on your keyboard while left clicking and it will deselect from the orange areas. Once you are satisfied with you selection, and all of the areas of the scan you want included are shaded with orange, press the “Next” button to continue to the trimming.
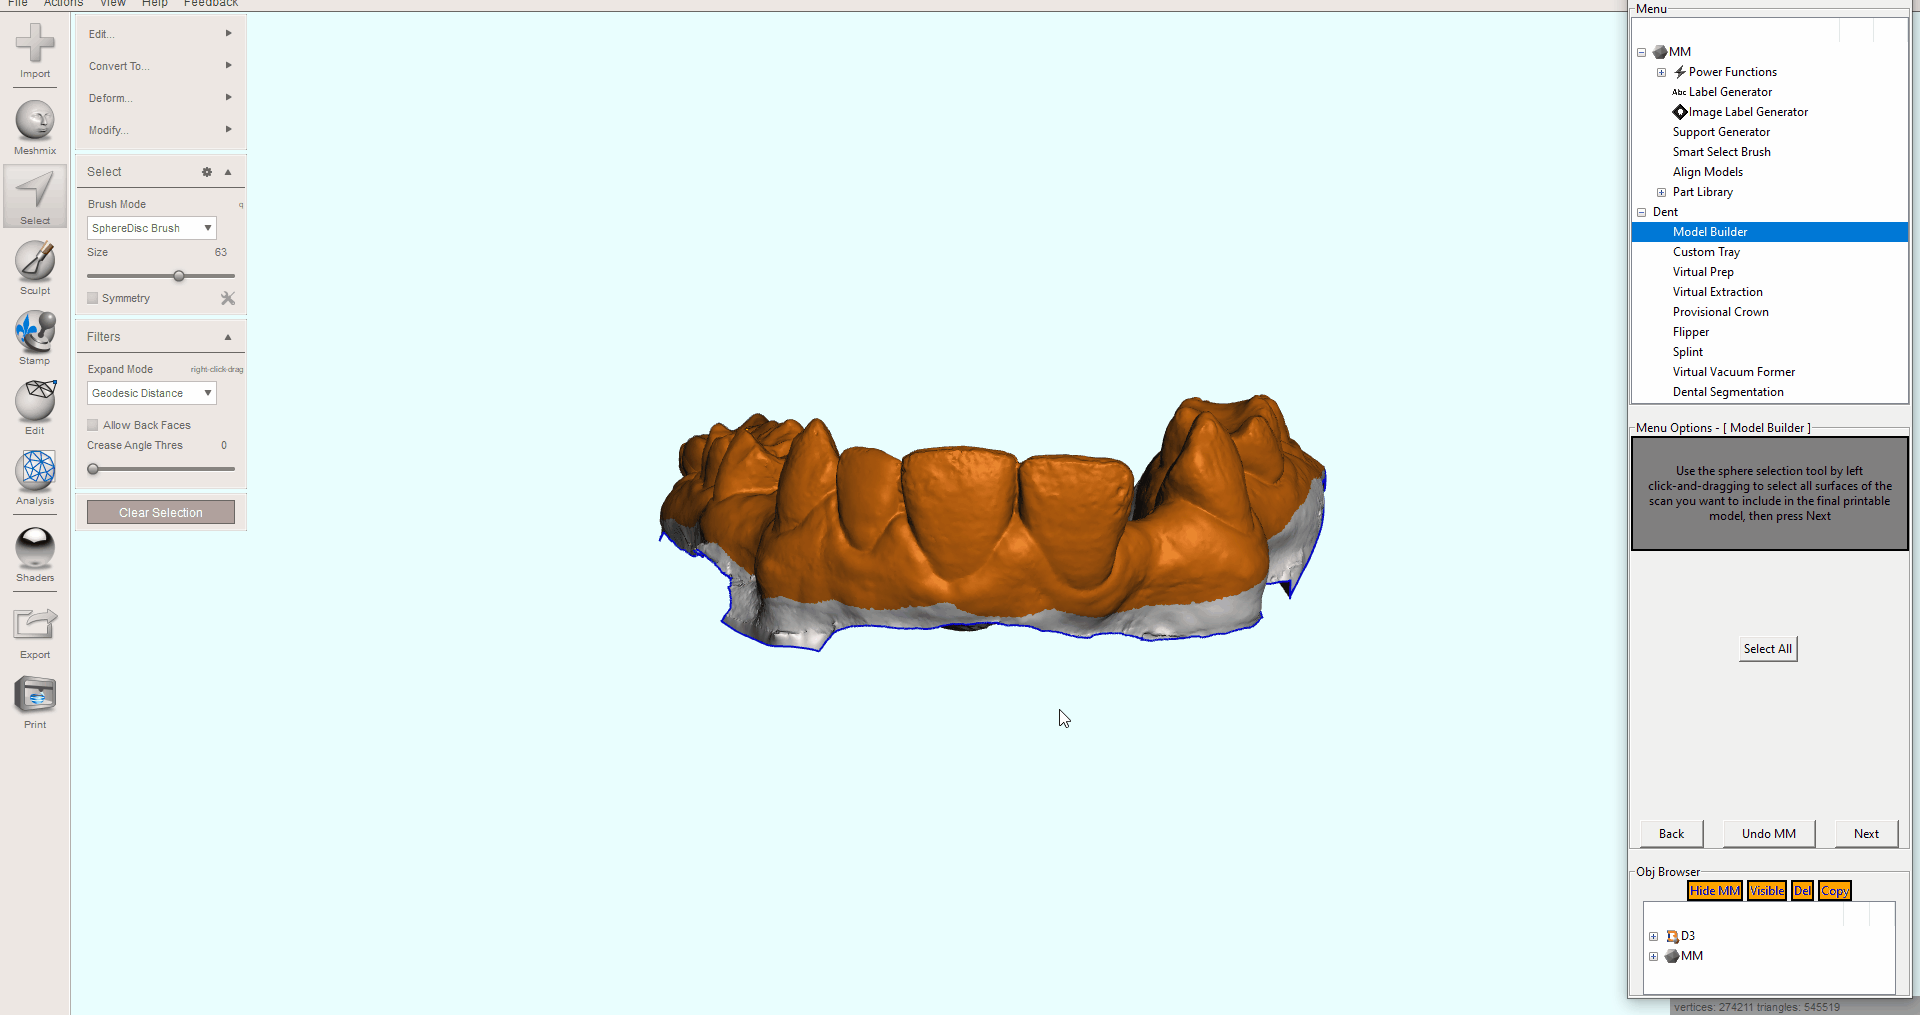
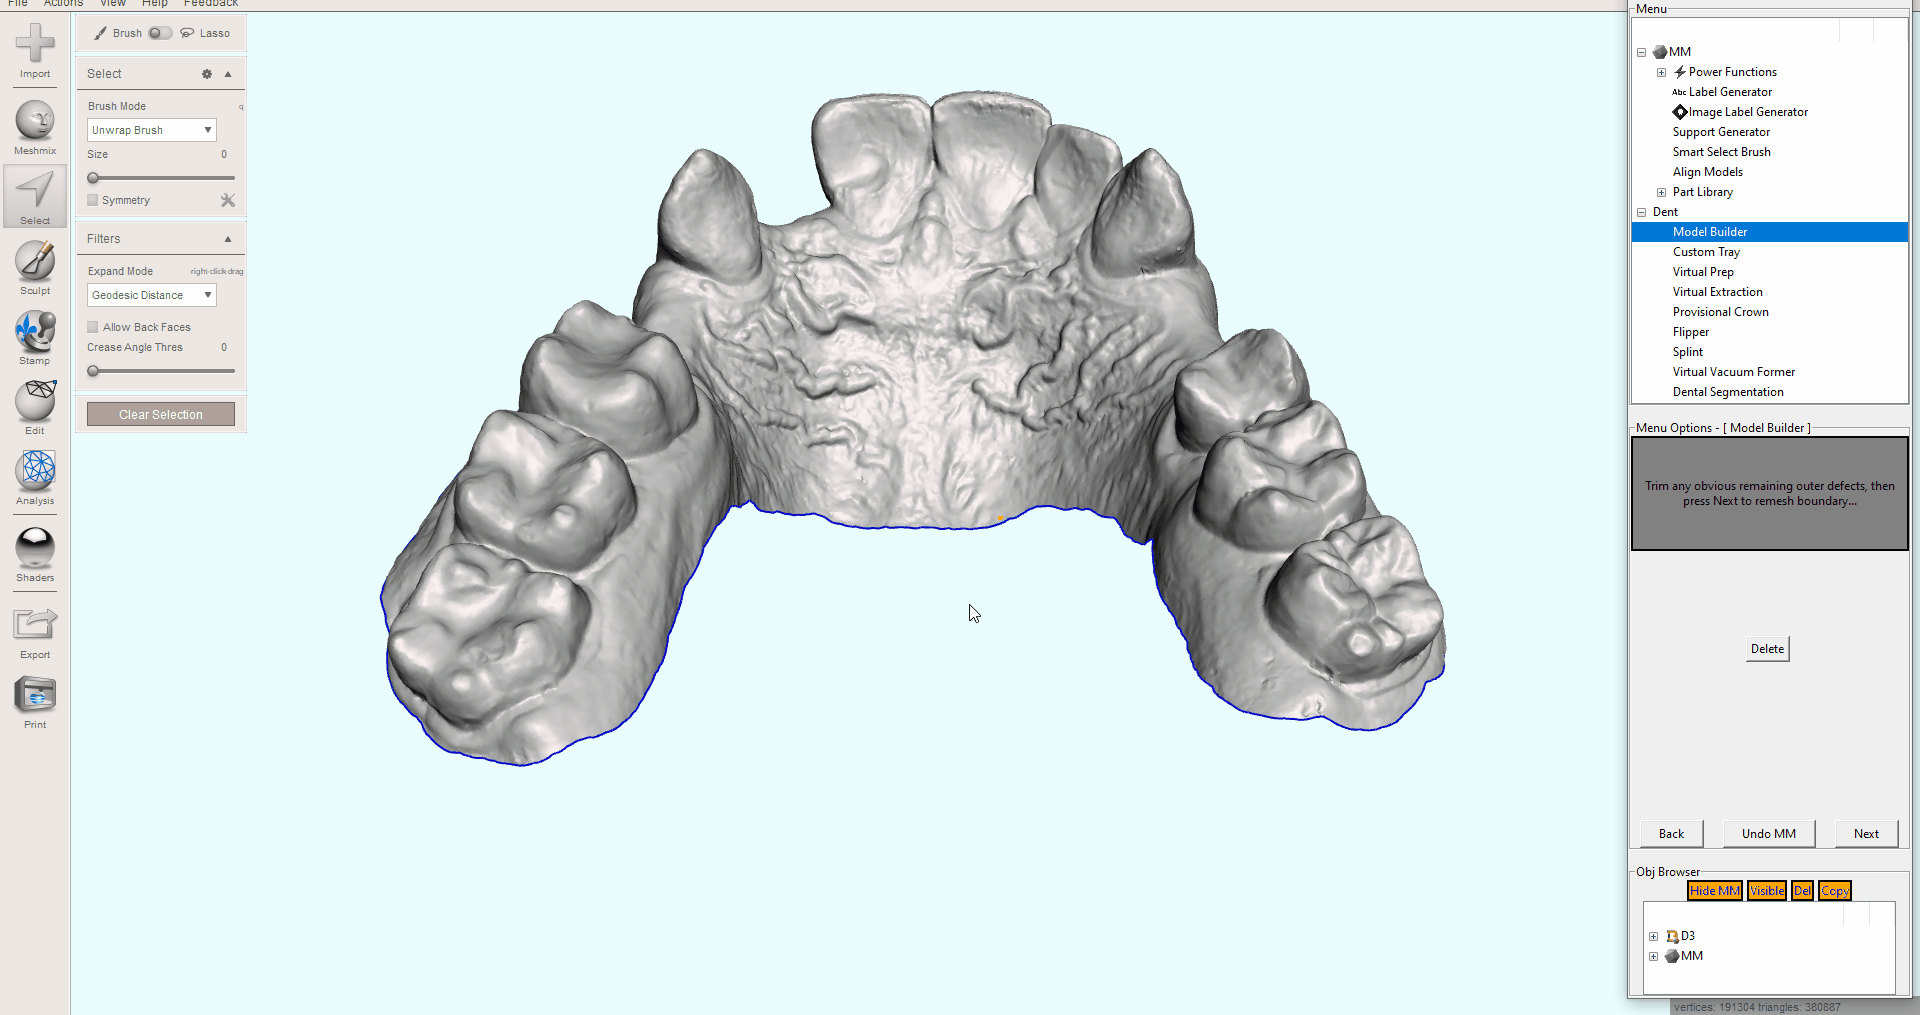
A certain percentage of the time, a good initial selection will be all you need, and no trimming will be required. However, it is always good to carefully inspect the borders and edges in case you find a small area that needs to be cleaned up. If you find it necessary to make some small trims, single left click to start a box selection. A red line will extend from your first click, and then from each additional single left click until you reach the initial point again. The goal is to encapsulate the portion of the model you want trimmed inside of the resulting red polygon shape. Once the area you want trimmed is selected, you can press the “Delete” button in the middle “Menu Options” section of D3Lab x64, to trim that area away. Do this as many times as you need, and then once you are satisfied your refined scan, press “Next”.
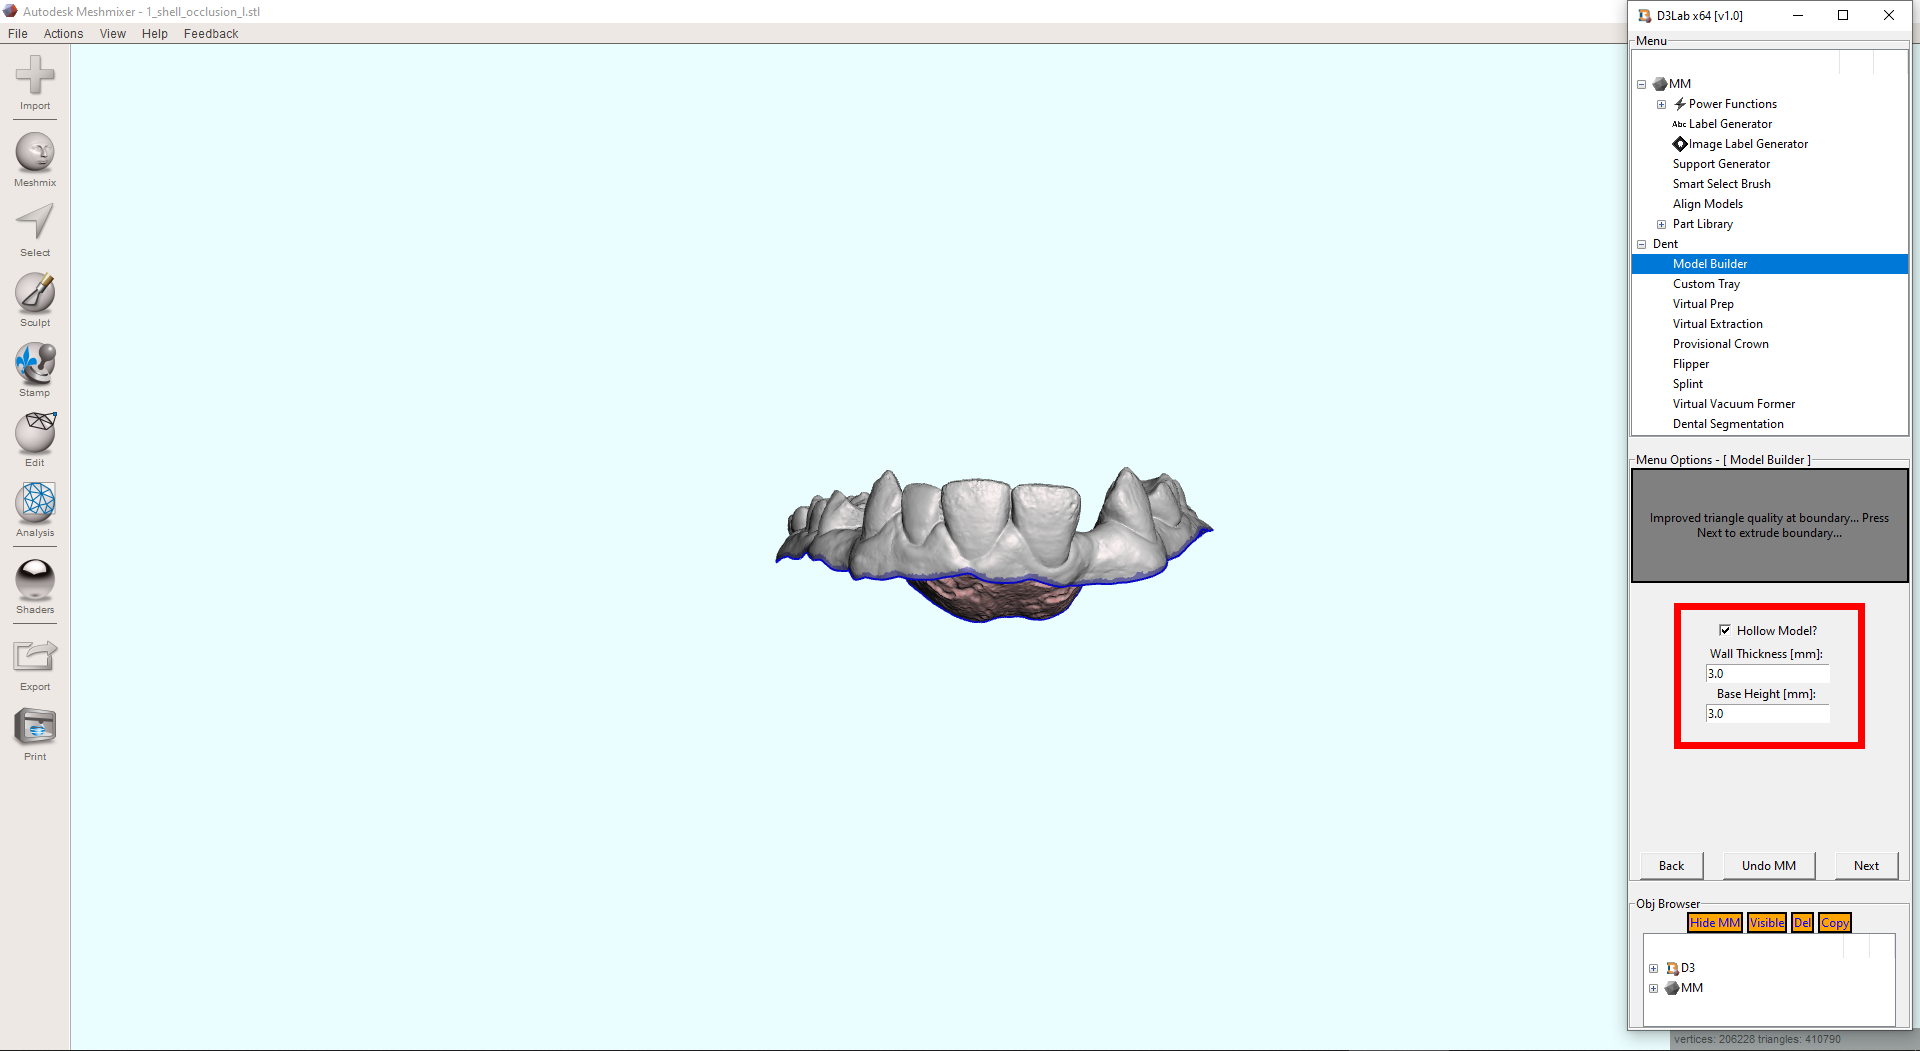
Model Builder – Set Parameters for Based Model – [Step 4]
You are now asked to select whether you want the 3D printable model hollowed (to save resin) or not, the thickness of the walls of that hollowed model (this value gets ignored if you are not hollowing the model) and the height of the base (calculated from the lowest area of the scan). If you experience cracking of hollowed models upon removal from the build plate (if printing flat without supports), you can try increasing the thickness of the walls to give some additional strength.
Model Builder – Post Basing Options – [Step 5]
Once the tool is completed and the model is based, you are given some additional options in the form of several buttons that are commonly used after basing models. These include “Print Vertical (Experimental)” and “Add Text Label”.
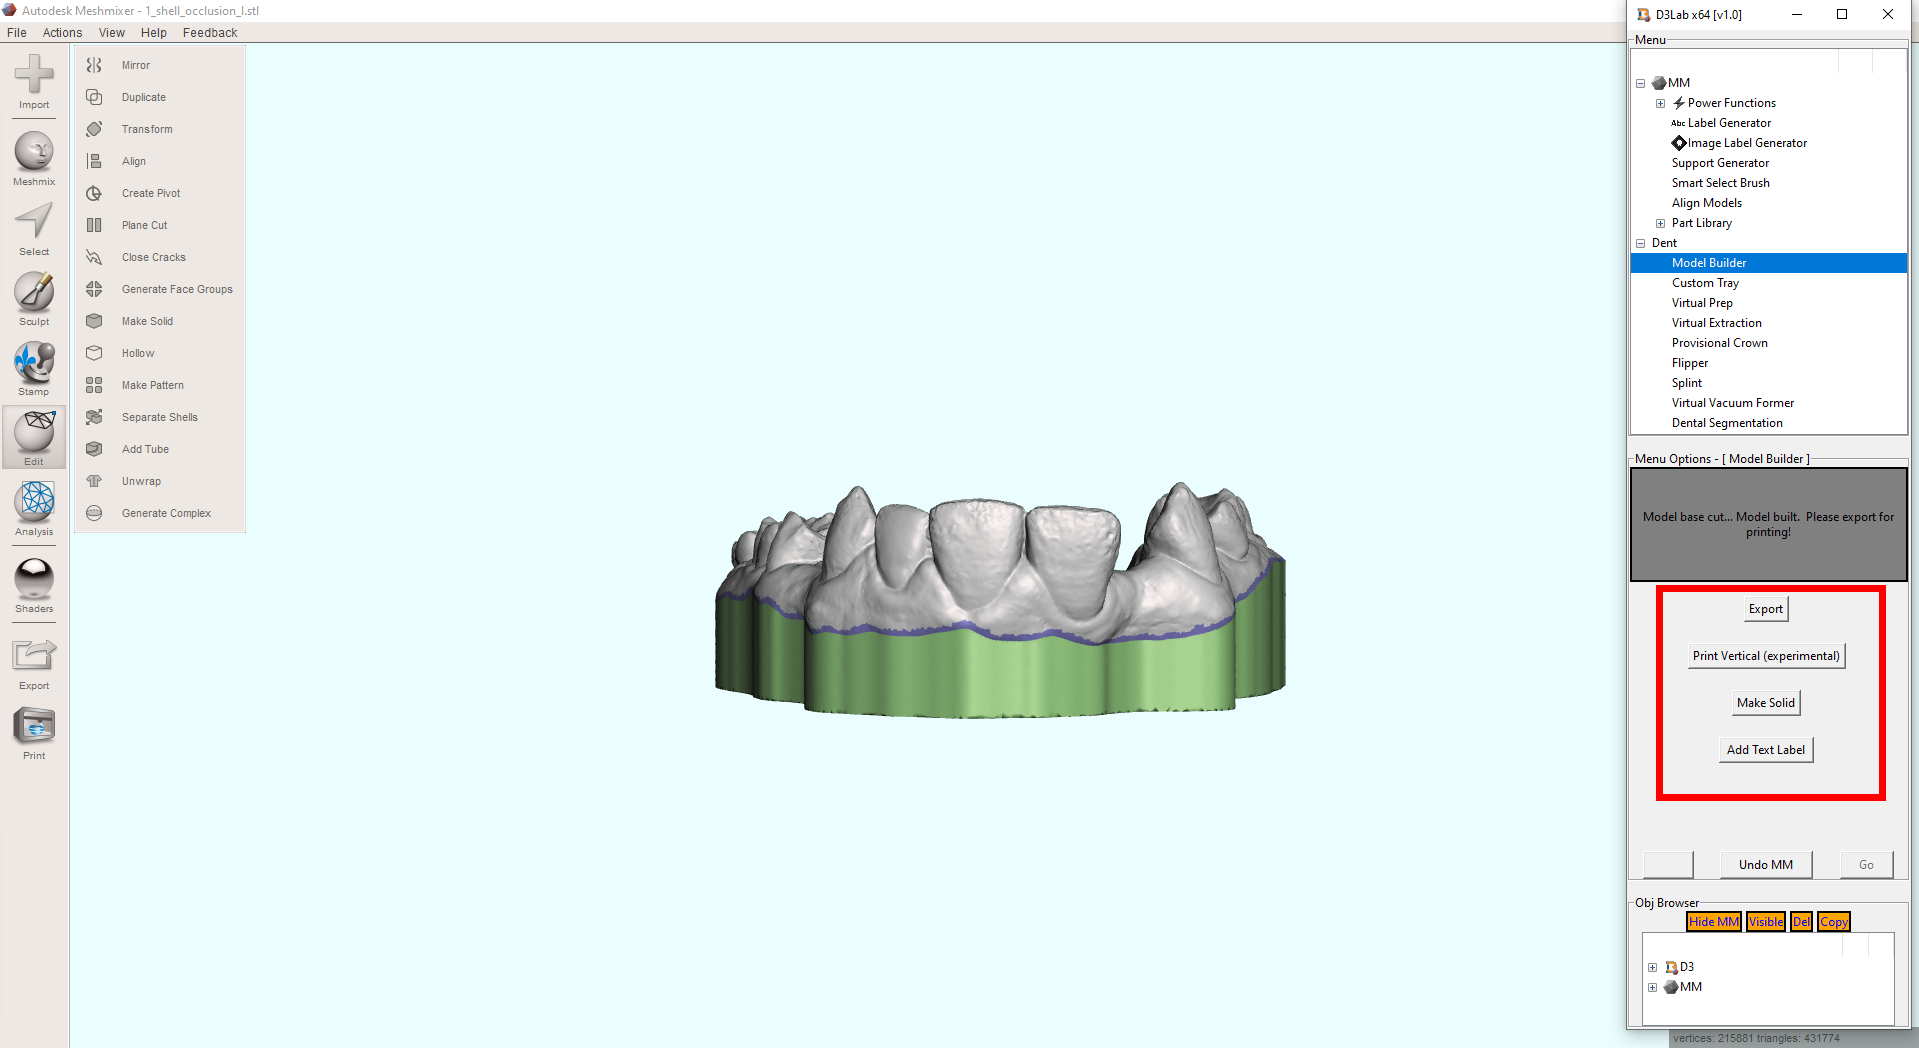
The “Add Text Label” button will start a new separate tool called “Text Label Generator”, which we will get to in an upcoming lesson. The “Print Vertical (Experimental)” button rotates your model slightly less than 90 degrees and then makes a plane cut along the heels of the model in an attempt to help convert your model to be appropriate for vertical 3D printing (this helps save room on your build plate and you can fit many more models in one printing session). The reason it is experimental, is because there is no guarantee the orientation or the flat cut on the heels will be sufficient for successful vertical printing. If you want to use this feature, it is mandatory you check all aspects of the converted model before exporting for printing.
Model Builder – [Advanced]
There were two options we skipped over at the beginning of this lesson which are the first options presented to you when the Model Builder tool is selected. They were “Auto Orient (Experimental)”, “Model Already Oriented” and “Feeling Lucky? (Experimental)” and can be summarized by:
- Auto Orient – A button that automatically brings an object to the center of Meshmixer, and attempts to point it in the correct direction to assist in the following manual alignment steps.
- Model Already Oriented – An option that when enabled, forces the Model Builder tool to skip the first three manual alignment steps. This is a helpful time-saver if you are certain your scan is already oriented correctly before running the tool.
- “Feeling Lucky” – A button that runs the entire Model Builder tool to completion without any steps or user input. Success of this feature is dependent not only on the scan being in proper alignment already (as with the “Model Already Oriented” option), but also that there is minimal extraneous data that needs to be removed (or it has been done already).
Here are some videos that demonstrate how the tool works (D3Mesh works in a similar way, so videos using that software can apply to D3Lab x64 as well):
Video 1 – How to quickly convert digital intraoral scans to 3D printable physical models
Video 2 – Tips for dealing with poor scan data or difficult scans
Video 3 – Advanced automation features that help save time for seasoned users
At the completion of this lesson, you should be able to:
- How to use D3Lab x64 to convert all types of digital IO scans to 3D printable physical models
- How to approach difficult scans or scans with poor data if you are getting failed results
- How to take advantage of the “Model Already Oriented” and “Feeling Lucky” features to increase efficiency